Installation
We made efforts to make the last release of GAMA (1.9.0) as easy as possible to install, by providing a version with an embedded Java JDK, limiting the installation to a 3-steps procedure: download, install and launch.
Download GAMA
GAMA 1.9.0 (the lastest release) comes in a version for each 3 environments Windows, macOS and Linux packaged in easy to use installers. You simply have to go on the downloads page and pick the one for your system.
For advanced users :
- GAMA provide also some versions without embedded JDK allowing you to download a lighter archive
- This version requires Java 17 JDK to be installed on your computer (at least 17.0.3+7)
- It's also possible to download these 2 kinds of releases in simple zip archive (i.e. without installers), if you do so, please refer to the post-installation procedure at the end of this page
You'll find them on the Github Release page
Install procedure
After downloading the chosen GAMA version from the Downloads page for your computer, you only have run the installer, follow steps, and launch GAMA.
Step-by-step Windows
- Download the installer
.exefor Windows - Double-click on the downloaded
.exefile - Accept to run the app

- Follow the installer with the onscreen steps
- Done, you can start GAMA from your computer now.
NB: If you need to launch GAMA Headless, GAMA is installed under
C:\Program Files\Gamaby default
Step-by-step macOS
In macOS we have two ways of installing gama: either the regular and user friendly .dmg installer, or the command line way with the homebrew package manager.
DMG version
- Download the installer
.dmgfor macOS- There is a built specifically for Macintosh M1 (also called with Apple silicon). You can check by clicking on the top-left apple,
About this Mac: the pop-up window will give details about the processor. If you're not sure and your Macintosh is from 2021 (or earlier) you probably need this specific version
- There is a built specifically for Macintosh M1 (also called with Apple silicon). You can check by clicking on the top-left apple,
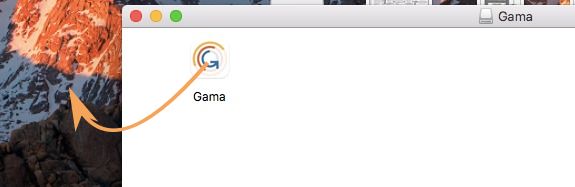
- Double-click on the downloaded
.dmgfile - Drag'n'drop GAMA icon to your computer (Applications folder or Desktop for instance)
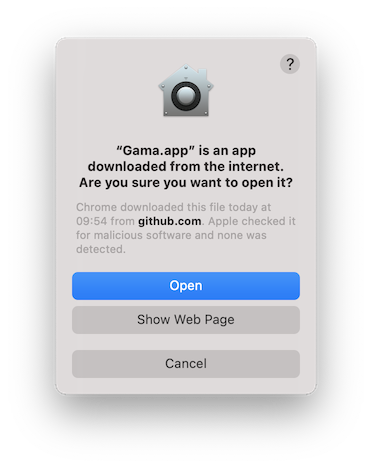
- Done, you can start GAMA from your computer now. At the first launch of GAMA, a popup window will appear warning you that GAMA is a software downloaded from internet and asking whether you want to open it. Click on the Open button.
NB: Note that the first launch of GAMA should be made in GUI mode (clicking on the icon) and not in headless mode. NB2: If you need to launch GAMA Headless after, GAMA is installed where you dragged and dropped the Gama.app
brew version
- Install brew on your computer: just follow the instruction from the website.
- Open a terminal
- Run the command
brew install gamaorbrew install gama-jdkfor the JDK version
Step-by-step Linux
Debian/Ubuntu based
- Download the installer
.debfor Ubuntu (and any Debian-based systems) - Double-click on the downloaded
.debfile - Click on
install
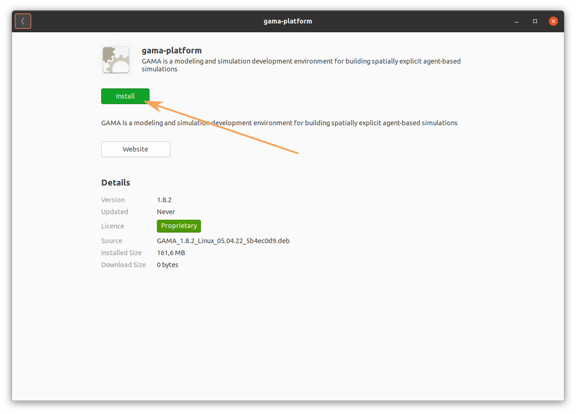
- You could be asked for your password
- Done, you can start GAMA from your computer now
NB: If you need to launch GAMA Headless, GAMA is installed under
/opt/gama-platform
Arch Linux based
AUR packages with latest version of GAMA exists for both version with and without embedded JDK. You can download them with a command as follows:
yay -S gama-platform{-jdk}
Step-by-step Docker
A Docker image of GAMA exists to execute GAMA Headless inside a container.
- Install docker on your system following the official documentation
- Pull the GAMA's docker you want to use (e.g.
docker pull gamaplatform/gama:1.9.0) - Run this GAMA's docker with your headless command (e.g.
docker run gamaplatform/gama:1.9.0 -help)
You can found all the tags and more detailed documentation on the Docker Hub or on the corresponding Github's Repository
System Requirements
GAMA 1.9.0 requires approximately 540MB of disk space and a minimum of 2GB of RAM (to increase the portion of memory usable by GAMA, please refer to these instructions).
Windows post-installation setting (only for zip install)
If you decided to install gama yourself from the zip file, it is important that you change the Windows HDPI compatibility settings.
To do so, go to your Gama.exe file, right click and it and select properties, then go to the Compatibility tab and click on the Change high DPI settings button:

In the new window, check the Override high DPI scaling behavior option and select the System value.

These options are necessary to avoid most graphical problem using gama on Windows